Zoom
The CSULB license agreement provides a Zoom Pro (Education) account to all faculty, staff, and students.
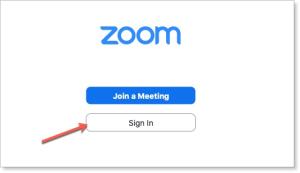
To ensure that you are using your CSULB-authenticated Zoom account, sign in using one of the methods below:
- Select the Zoom icon on SSO/MyApps.
- Open the Zoom App on your desktop computer (if installed).
- Click on a Zoom meeting link and sign in with your CSULB credentials.
You may be prompted to complete these steps; please select "Sign in with SSO":
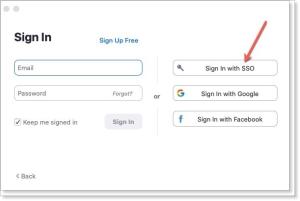
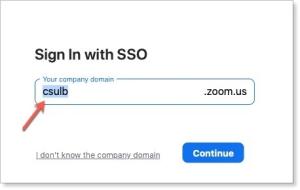
Type "CSULB" as "Your company domain:"
The CSULB license includes the following features:
- Meetings:
- 300 Participants per meeting
- Duration of up to 30 hours per meeting
- Webinar option by request to ATS (see below)
- AI Companion
- Whiteboard; unlimited boards
Zoom Webinars
CSULB faculty and staff planning events with more than 300 participants can request access to a Zoom webinar for a specified period of time from ATS. Students must have a faculty or staff sponsor submit the request on their behalf.
Compare the features to decide if a webinar is right for you: Zoom Meetings vs. Webinars.
Please submit this form: Zoom Webinar Request Form
More Webinar Options
- Use Microsoft Teams for your webinar: Getting Started with Teams Webinars.
- Purchase a dedicated Zoom webinar license for your department or team. For more information about the pros and cons of this option, contact zoom@csulb.edu.
When you record a meeting in Zoom, you have the option of saving it in the Cloud or on a local device (e.g., your computer or external hard drive). However, please keep in mind that recordings can only be saved in the Zoom Cloud for a limited time:
- Faculty/Staff: Recordings will be deleted from the Zoom Cloud after 210 days.
- Students: Recordings will be deleted from the Zoom Cloud after 7 days.
As a best practice, save all your Zoom recordings in one of the following ways:
- Save as a local file on your personal computer or other storage devices
- Save to OneDrive/SharePoint
- Upload to a YouTube account
Visit the CSULB Zoom FAQs page for the most frequently asked questions about our campus license and how to use Zoom.
Best Practices for Zoom Meetings
Get Informed
- Tips and Tricks: Teachers Educating on Zoom [PDF]
- How to Keep Uninvited Guests Out of Your Zoom Meeting
- Zoom Etiquette Tips for Students [PDF] (Share with students!)
- Review the Security and Accessibility tips below on this page.
Set Up Your Zoom Controls
- Create or select your preferred Virtual Backgrounds:
- Verify that power settings (Mac users) are set to at least 1 hour to avoid screens turning off during an active Zoom session.
- Enable the Waiting Room:
- Select "Users Not in Your Account." This setting will only allow CSULB-authenticated students to be admitted directly to your class.
- Non-authenticated users must wait in the Zoom waiting room for you to admit them. In this case, you may want to customize your waiting room screen with a reminder to students to log in to their CSULB Zoom accounts.
- To admit non-CSULB guests, follow these steps [PDF].
- Set your Recording layout preferences. You have options to record the screen, but not the participants. Or, you can choose to display your screen and the presenter only.
- Test the Zoom controls (audio, video, chat, share screen, polling, break-out rooms, etc.).
- Close unnecessary tabs in your browser and desktop.
Set Up Your Environment
- Find a quiet meeting location without background distractions.
- Use a headset or microphone for better-quality audio.
- Get a web camera to use the camera setting for the meeting.
- Test your audio and web camera.
- Adjust lighting so that you are well-lit and not in shadows.
During the Meeting:
- Taking Attendance [PDF]
- Review housekeeping details with attendees such as:
- Mute microphones when not talking.
- Raise hands and unmute to speak.
- Chat window for questions and contributions.
- Recording availability.
- Record the session by pressing the “Start the Recording” button.
- Look into your webcam, not at the screen.
- Watch the chat window for questions (if you can have a second person manage this, it's much easier).
- Narrate the material on the screen for low/no vision students.
After the Meeting:
- Inform students about access to the recording.
- Wait for all students to leave the meeting before you.
The following measures will help keep your Zoom meeting secure and reduce the chance of unwanted attendees and disruptions.
- Use the CSULB Single Sign-On to log in to your Zoom account.
- Keep your Zoom meeting private and secure, rather than hosting a public event on social media.
- Avoid hosting large, public meetings using your Personal Meeting ID (PMI).
- Review your screen-sharing settings.
- Lock your Zoom meeting once it has started and all your expected participants have joined.
- Select Require Meeting Password (under "Meeting Options") when scheduling a meeting
- Enable the Waiting Room feature to control when participants join the meeting. To admit non-CSULB guests, follow these steps [PDF]
- To remove a disruptive participant, click on "Participants" at the bottom of your Zoom window, then select "More" and "Remove."
- If a participant displays objectionable content, you can quickly stop the video. Stopping the video will not remove the participant from the meeting, but will restrict their ability to restart their video.
Student Privacy on Zoom
Review the CSU Student Privacy in Online Learning policies for guidance on camera and audio use in Zoom meetings.
Get Informed
- Contact BMAC for information on how to best support students with disabilities.
- Review Zoom Accessibility features.
- Provide manual captioning, if possible.
A Note on Live Transcriptions
Live Transcriptions are available on Zoom and can generate live, speech-to-text transcription on-screen. However, please note that Zoom Live Transcription does not meet the legal criteria for accommodating students with disabilities.
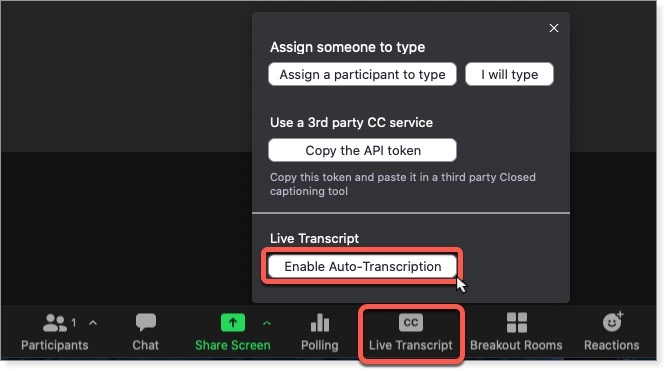
To enable live transcription, go to the "In Meeting" settings of your Zoom account (web portal) and click the checkbox under "Closed Captioning:"

Then, in your Zoom meeting control panel, click the Closed Caption CC icon to open the menu; make sure "Enable Auto-Transcription" appears in the box:
Select a training session offered by Zoom to learn more best practices and enhance your skills: Zoom Training Workshops/Webinars.
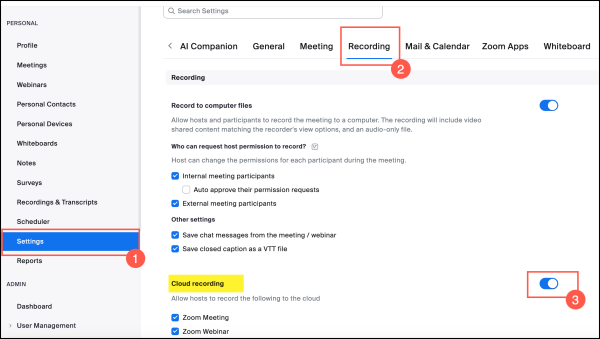
To back-up your Zoom recordings in the cloud, you will need to enable Cloud Recording in your Zoom Settings from the Zoom web portal via Single Sign-On (SSO).
- In the Zoom web portal, navigate to Settings.
- Select the Recording tab.
- Move the toggle to the right to enable Cloud recording.
You can manage your Zoom Cloud recordings by clicking the Recordings & Transcripts link.
- Sign in to the Zoom web portal via Single Sign-On (SSO).
- Navigate to the Recordings & Transcripts tab.
- Under the Cloud Recordings tab, select the cloud recording you want to download.
- In the recording’s page, click Download on the desired recording.
- A confirmation prompt will appear. Click Download to confirm.

Note: Depending on your setup, you might receive prompts asking for confirmation to download files, choose a save location, or provide additional information. Follow these prompts to complete the download process.
Zoom AI Companion
These Zoom AI Companion features must be enabled manually; visit the links below for detailed instructions.
Features Overview
Meeting Summary:
- After a meeting, the host will receive a written summary of notes via email that can be edited and shared with participants (may take up to 3 hours for summaries to be generated).
- Meeting summarization only begins when the host (or co-host) selects "Start Summary" or if the host has enabled the "automatic start" setting in their Zoom account.
In-Meeting Questions:
- During a meeting, participants can ask questions such as, “Catch me up,” to get a summary of the content discussed up to that point.
- Participants who join the meeting late or must step away can ask for an update to be on track with other participants.
Smart Recording:
- After meetings, the host will receive via email a link to a video recording of the meeting along with a written meeting summary.
- Smart meeting summaries have advanced features that organize the notes into highlights, smart chapters (time-stamped to match the video), and next steps.
- Smart recordings work only when meetings are saved to the Zoom cloud.
Zoom does not use customer audio, video, chat, screen sharing, attachments, or other communications-like content (such as poll results, whiteboard, and reactions) to train Zoom’s or third-party AI models.
For more information, visit How Zoom AI Companion features handle your data.
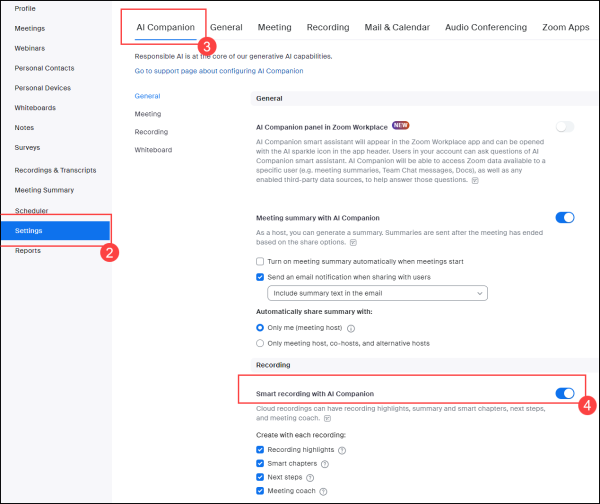
- Sign in to the Zoom web portal via Single Sign-On (SSO).
- In the navigation menu, click Settings.
- Click the AI Companion tab.
- Under Recording, enable the Smart Recording with AI Companion toggle.
- (Optional) Select or clear any of the following check boxes as desired.
- Create recording highlights: Zoom will automatically highlight the most important parts of the recording. Hosts can adjust the highlights as needed and share the video summary with users.
- Create smart chapters: Zoom will automatically group sections of the recording into chapters with an overview. Hosts can edit the chapters manually.
- Create next steps: Zoom will automatically summarize any actions to take after the recorded session. Hosts can edit the next steps manually.
- Meeting coaching: Zoom will provide additional analytics on key meeting and conversation factors, including talk speed, talk-listen ratio, longest spiel (or monologue), filler word usage, and patience.
Note:
- If you clear all the check boxes, Smart Recording will be disabled.
- Within a Canvas course, "Create recording highlights" is the only Smart Recording feature available to students. If you would like students to see all the features of Smart Recording, the recording link will need to be shared from your CSULB Zoom web portal.
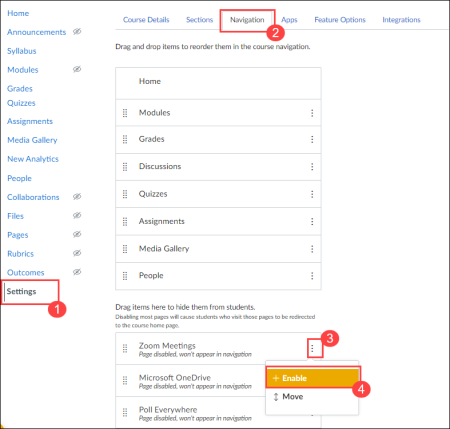
- From the Course Navigation menu, click the Settings link.
- Select the Navigation tab.
- Scroll and click on the three dots to the right of Zoom Meetings.
- Select Enable.
- Scroll down to the bottom of the page and click Save. The Zoom Meetings link will appear on the Course Navigation menu.
- Select Zoom Meetings from the Course Navigation menu.
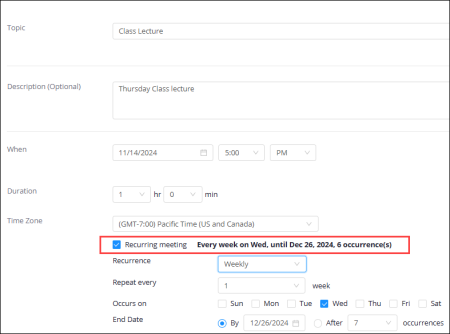
- On the far right, click on Schedule New Meeting at the top of the page. To learn more about scheduling meetings, visit the Scheduling Meetings guide.
- To schedule a recurring meeting, click the Recurring Meeting checkbox. You can set how often the meeting recurs, the number of meeting occurrences, and the date for the final occurrence.
- Note: When scheduling a recurring meeting, each occurrence is created as an independent event. To modify all recurring meetings, you must edit each meeting individually.
You can import upcoming meetings, previous meetings, and cloud recordings created on your Zoom web portal via SSO into your Canvas courses.
Note:
- It is recommended to have the Meeting ID available before beginning the import.
- You can associate meetings with multiple courses and contexts. There are no limits to the number of courses and contexts you can associate a meeting with.
- Select Zoom Meetings from the Course Navigation menu.
- Click on three dots to the far right of the page.
- Click Import Meeting.

- Enter a meeting number and click Import.
- If you imported Upcoming Meetings, Previous Meetings, or Cloud Recordings, they will be available under the designated tabs on the Zoom Meetings home page.
- Select Zoom Meetings from the Course Navigation menu
- Click on the Cloud Recordings tab.
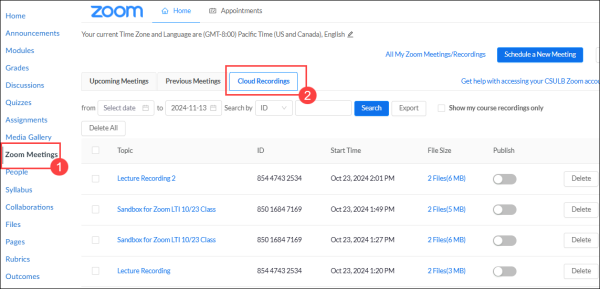
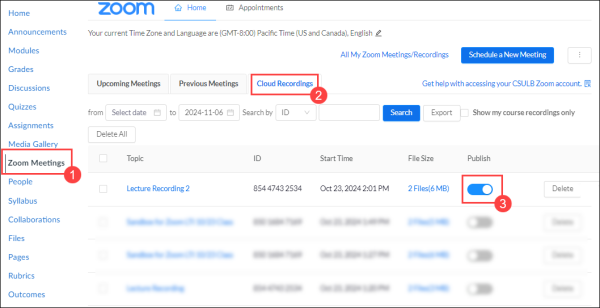
You can publish your Zoom cloud recordings so that your students can access them directly for the 'Zoom Meetings' course link.
- Select Zoom Meetings from the course navigation menu.
- Select the Cloud Recordings tab.
- Under the 'Publish' column, move the toggle to the right to publish the recording.
To add a Zoom recording in Modules as an external link or as a hyperlink in the Rich Content Editor, you will need to obtain the recording shareable link first. To do so, follow the steps below:
- Sign in to the Zoom web portal via Single Sign-On (SSO).
- Navigate to the Recordings & Transcripts tab.
- Under the Cloud Recordings tab, select the cloud recording you want to share.
- In the top-right corner, click Share.
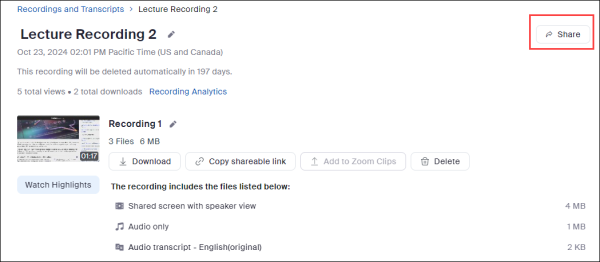
- Adjust your share settings as desired.
- Next to 'Shareable Link', click Copy.
Modules:
- Copy the Zoom recording link from the steps highlighted above.
- Follow the steps in the Canvas support article: How do I add an external URL as a module item?
Rich Content Editor:
- Copy the Zoom recording link from the steps highlighted above.
- Follow the steps in the Canvas support article: How do I create hyperlinks to external URLs in the Rich Content Editor?
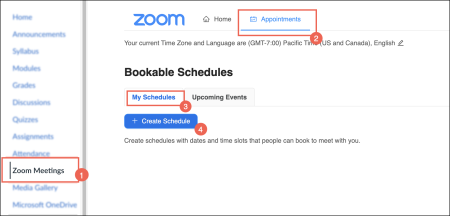
Instructors can create schedules for virtual office hours utilizing the Appointments tab in Zoom Meetings. Once a schedule has been created, students can book appointments from within Canvas, and instructors can join the appointments by selecting the Upcoming Events tab.
- From your course navigation menu, click on Zoom Meetings.
- Click the Appointments tab.
- Select My Schedules.
- Click + Create Schedule.
For further details on how to set up a schedule, visit the Using LTI Easy Scheduler as an instructor support guide. Students can also learn how to access the scheduler by following the steps in the Using LTI Easy Scheduler as a student section.


