Canvas Accessibility Requirements

The guidance on this page outlines basic accessibility requirements for content built within Canvas. For guidance on external files typically uploaded to Canvas, visit:
Pro Tip: In an existing Canvas course, run a UDOIT scan to identify accessibility issues and get onscreen help to facilitate your remediation process.
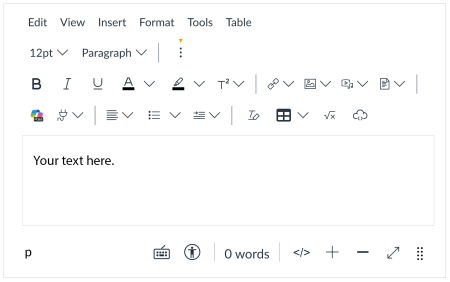
Canvas Rich Content Editor
The Rich Content Editor (RCE) is one of the main tools in Canvas that supports the creation of accessible course content.
The RCE provides a simple interface to format text, and insert documents and media. It automatically generates the HTML code that screen readers and other assistive technologies rely on.
The RCE is available within Canvas Announcements, Assignments, Discussions, Pages, Quizzes, and Syllabus.
Accessibility Requirements
Follow the guidance below to address the most common accessibility issues in Canvas course content.
Headings and paragraph styles communicate the organization of content. Screen reader users can use shortcut keys to jump between headings, and all learners benefit from content that is easy to scan and follow.
How to Define Text Structure in Canvas
Use the menu in the Rich Content Editor to define the heading and paragraph styles of your text. In the RCE menu:
- Highlight your text in the content development box of the RCE.
- Click the dropdown menu for text formatting styles.
- Select the appropriate style (descriptions below).
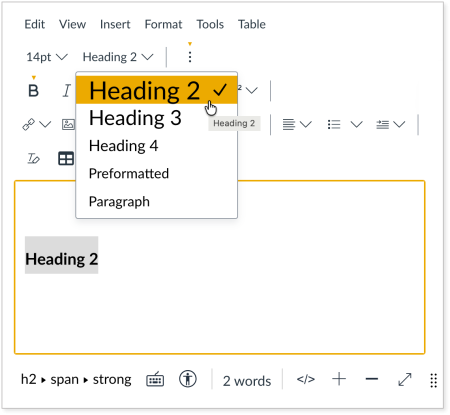
Headings 2,3,4
Headings (appears as <h2>, <h3>, and <h4> in the code) create a hierarchical structure for the page, similar to an outline or table of contents for a report. The <h1> style is included in the Canvas page by default; you don't need to manually add it.
- Heading 2 defines the title for the content that will follow it.
- Headings 3 and 4 represent related sub-headers of Heading 2.
Do not skip heading levels (e.g., h2 to h4); it may confuse the person using a screen reader if the sequence is not in numerical order.
Preformatted
Preformatted styling (appears as <pre> in the code) is used only for text that truly requires preserved spacing, line breaks, and indentation, such as computer code or equations. This will prevent the text from wrapping or behaving like paragraph styling when resizing the web browser.
Paragraph
The Paragraph style (appears as <p> in the code) defines the main content under the headings.
Pro Tip:
- Header and Paragraph styles define the structure of content and must be used consistently.
- To customize the appearance of your content for visual emphasis and readability, use the additional text formatting controls provided in the RCE (next to the Header and Paragraph menu) to change the default font size, color, boldness, italics etc.
Alternative text (alt text) is a short description that you must insert into the metadata of the image.
Alt text helps people using screen reader devices to understand the meaning of the image related to the content around it. Images that are not relevant or important are marked as "decorative" so screen readers know to skip over it.
How to Add Alt Text in Canvas
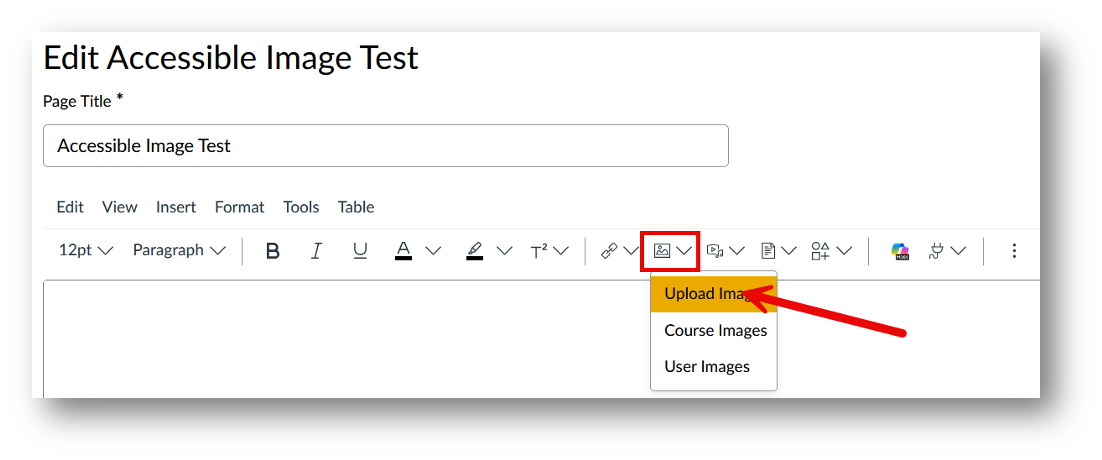
Select the media icon on the RCE menu to open the "Upload Image" dialog box.
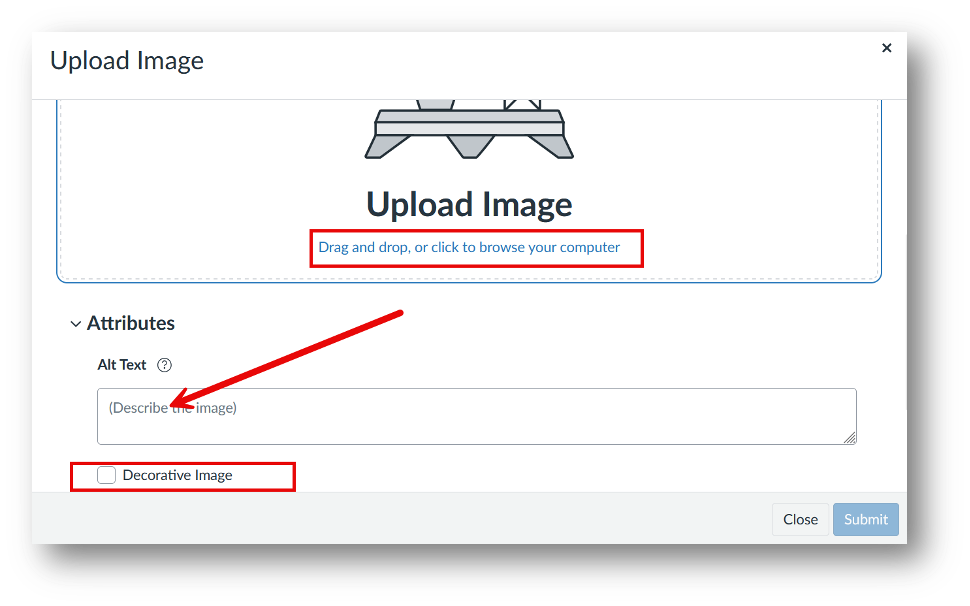
After inserting your file, fill in the alt text field at the bottom of the dialog box with a short description.
- Do not use the words "image of" as this is already announced by the screen reader system.
- Keep the alt text description as brief and succinct as possible (no more than 120 characters).
- Spell out any text that is part of the image.
- If the image is not critical to understanding the content of the text around it, select the "Decorative Image" box.
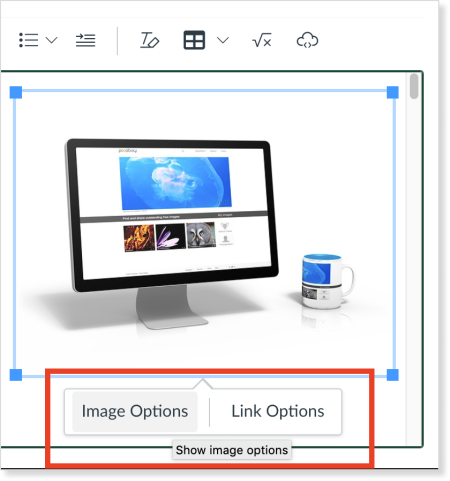
To add alt text to an existing image, click the image and select the "Image Options" button. Add the alt text.
Complex Images
Complex images such as charts, graphs, tables, diagrams, organizational charts, and maps typically contain more information than can be communicated in a brief alt text phrase. These images require a two-part solution:
- Include a brief description in the alt text with a note directing the user to the location of more information in the content around it. For charts, this short description should include the title, chart type, and a brief summary of the main findings.
- In the page content, provide a longer description that summarizes the essential information, such as numerical values, relationships, trends, scales, patterns, etc.
Embed links into text to communicate their purpose and destination. People using screen readers can scan content quickly to identify links; clear descriptive text makes them easier to identify and understand where they lead.
- Integrate links naturally into a few words in the sentence; do not link an entire sentence.
- Include the file type when linking documents, such as [PDF], [DOC], [XLSX], etc. to alert the reader of the change in format.
- Do not use the words, “click here” or “read more" as this does not provide sufficient information.
- Do not paste in the "raw" URL itself into the content; embed it into the text instead. For example:
Instead of:
- Roman mosaics were a common feature of private homes: https://www.worldhistory.org/article/498/roman-mosaics, or
- Roman mosaics were a common feature of private homes: click here.
Use: Roman mosaics were a common feature of private homes.
How to Embed a Link in Canvas
- Select the text you wish to link. In the RCE menu, select the link icon. Select "External Links" for a webpage or "Course Links" to link to course content.
- A pop-up window will appear; paste in your web address (URL). Click DONE.
- If you are linking to content in your Canvas course:
- Place your cursor on the page where you want the link to appear,
- Select the link icon and "Course Links." This will open a panel on the right to link to any content in your course.
- Select the dropdown arrow to open menu items and see all pages, assignments, etc. to select a specific file.
Tables must include header rows or columns so that screen readers can make sense of the cell structure and data relationships. The table header row (or column depending on your data) must be set manually using the "Table properties" tool in the RCE.
In addition, tables must not contain split cells, merged cells, empty cells, or nested tables (a table within a table), as these are difficult to decipher by screen readers.
Note: Table are used to display data only and must not be used as a page design layout method.
How to Insert a Table and Header Row in Canvas
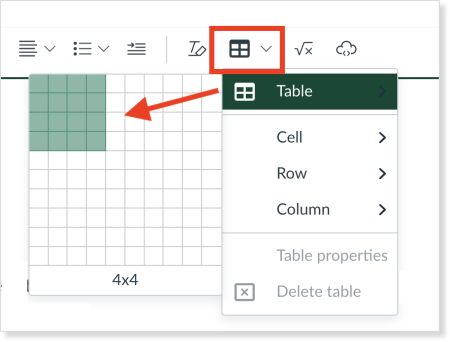
Select the table icon in the RCE. Select the number of rows and columns for your table. Fill in your table with data.
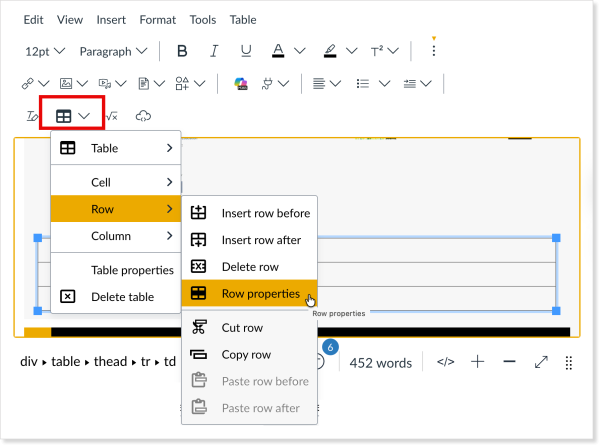
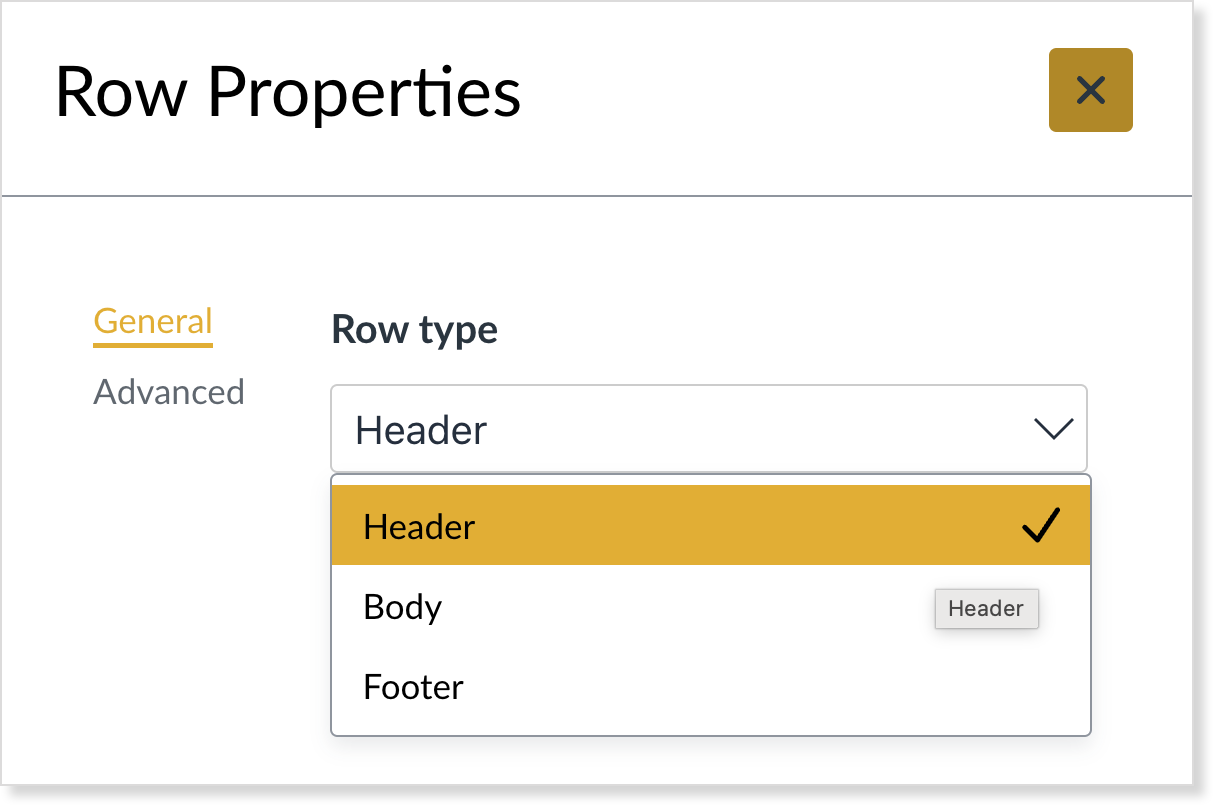
Define the header row or column by clicking on the top row. Click the table icon in the RCE menu. In the pop-up box, select "Row properties," and then select "Header" as the row type:
To format a list in Canvas so that the HTML code is properly set up and distinguishable by a screen reader, use the built-in list tool in the RCE. Avoid inserting bullets or numbered lists that have been copied and pasted from other sources as the may not be coded correctly.
- Unordered lists (code appears as <ul>) are for content having no order of sequence or importance. List items are typically prepended with a bullet point.
- Ordered lists (code appears as <ol>) are for content presented in sequence, numerical order, or by rank. Items are listed with a number, letter, Roman numeral, etc.
How to Format Lists in Canvas
Highlight the text you wish to become a list. Select the list style you desire: bullets, numbers, letters, or Roman numbers.
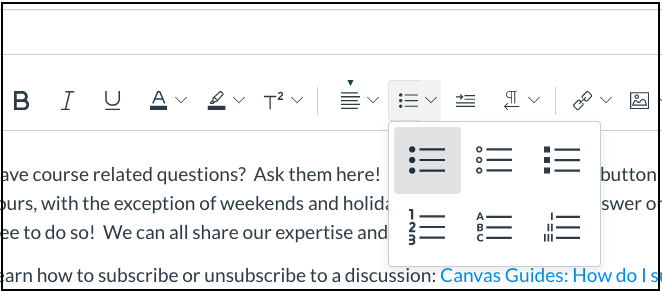
Use your tab key or the "increase or decrease indent" icon to move text right or left to show hierarchy within the bulleted text as when developing an outline for a report.
Some people with low vision or color vision deficiencies have trouble distinguishing certain colors. In addition, there are many types of common color-blindness including red/green and blue/yellow color-blindness that must be considered.
- Color is not the only way meaning is communicated. If you use red text to signal importance, also bold it or add a label such as “Important."
- Use sufficient contrast between text foreground and background. To check contrast, use the built in accessibility checker in Canvas to help you meet color contrast requirements:
Check Your Color
- Select the Accessibility Checker icon at the bottom of the RCE.
- If your text does not meet color contrast requirements, the accessibility checker will open a panel to the right, displaying a color chart.
- Use the scroll bar below the chart will to change the contrast. Once the minimum requirements are met, the "Apply" button will activate to enable you to apply the new color.
Canvas provides an integrated tool for math and science formulas based on LaTeX, the industry standard for academic publication. The LaTeX Math Editor is built into the Rich Content Editor. Canvas also includes the option to create equations and expressions with its graphical point-and-click editor.
The Math Editor can be used for basic mathematical formatting for introductory math courses or for more advanced mathematical text for higher-level math courses. Both students and instructors have access to the editor. Learn more at the Canvas support site: How do I use the Math Editor?
Once you open the equation editor, a window opens to allow you to create the notation, or switch to Advanced view to type and paste LaTeX.
Canvas Accessibility Checker
The Canvas Accessibility Checker feature in the Rich Content Editor identifies accessibility issues in content such as heading structure, alt text for images, header rows for tables, and color contrast. Learn more: Canvas Guides: How do I use the RCE Accessibility Checker?
>Check Accessibility
When you select the Accessibility Checker icon, a side panel appears on the right side with the results.
- If your page contains an image without a description, the accessibility checker will display a field to add your alt text.
- If your table does not contain a header row, the accessibility checker provides an option to do so.
- If your page has poor color contrast, the accessibility checker will display a color chart that allows you to change the color contrast.
- If the checker does not detect any issues, it will let you know. Automated checks do not identify every potential accessibility barrier, so manual review may still be needed.
Immersive Reader
Canvas also includes the Immersive Reader feature. This can help you "hear" how content is read aloud, similar to a screen reader. While it does not include all features and functions of a screen reader, it does a good job reading the information on the page, including image descriptions.
You can locate the Immersive Reader on any Canvas page at the top right, with the exception of the Homepage. Immersive Reader is not enabled in quizzes nor assignments or discussions, only content pages. Click on the Immersive Reader button to begin.