


Faculty Center - Teaching Schedule
This guide covers the self-service functionality for instructors to view teaching schedule information, view class rosters, and submit grades through MyCSULB Faculty Center. Instructors may also have access to student information through the Advisor Center and class information through Class Search.
Once you have logged into CSULB Single Sign-On, select the Faculty Center icon to get started.

Faculty Center was updated on December 1, 2023 with a brand new user interface! Visit the What's New with Faculty Center and Advisor Center page to familiarize yourself with the new experience. Tutorial screenshots below may reflect the classic experience, but most steps remain the same. For a limited time, faculty and advisors have the option to revert back to "classic mode," if desired.
Please note that familiar links may now appear on the right-hand side of your screen (example below):

On this page:
- My Schedule: information about viewing your teaching schedule.
- Worklist Requests: information about managing student requests that require approval, including Permission to Add and Withdrawal requests.
- Class Roster: learn how to view and manage your class rosters.
- Grade Roster: learn how to submit mid-term progress reports and final grades, create Incomplete Grade Agreements, and submit change of grade requests.
Browser requirements:
- To access all the functions necessary for navigating in MyCSULB Student Center, the web browser on your computer must meet minimum browser requirements.
- Be sure pop-ups are enabled for your browser. Some functions use pop-up windows to process your requests.
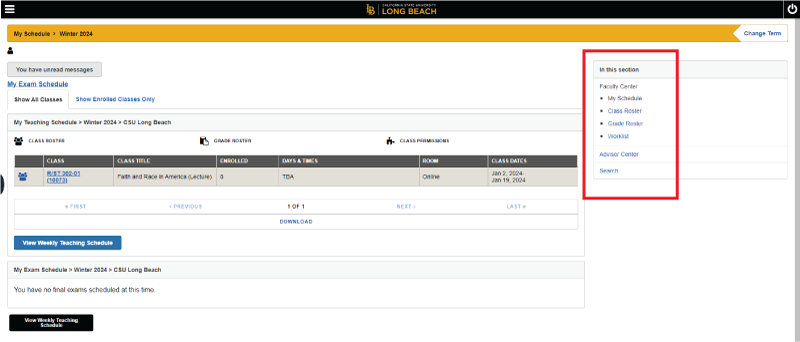
My Schedule
Your Faculty Center home page displays your teaching schedule. Once final exams schedules are generated, your Exam Schedule will also display.
To view your teaching schedule for another term, click on the yellow “Change Term” button in the upper right of your screen (pictured below), select the appropriate term, and click on the “Continue” button.

Your teaching schedule will display the classes you are assigned to teach for the identified term.
By clicking on the icons to the left side of each class listed on your teaching schedule, your class roster or grade roster will be displayed. Refer to the Icon Legend above your teaching schedule for the appropriate icon.
You must be assigned as an instructor for the class in the Student Administration system for the class to appear on your schedule. If a class does not display on your schedule, contact the department regarding your assignment. Once the information is changed in the Student Administration system, it is immediately available on MyCSULB and will be available via CANVAS the following day.
- If a class has multiple meeting patterns, the class will appear multiple times in your teaching schedule.
- The Class field displays the unique number which students use when enrolling in the class.
- The Class Title field displays the title of the course as well as the class activity type, e.g. Lecture, Lab, Seminar, Activity, Supervision.
- The Enrolled displays the number of students who are currently enrolled in the class.
- The Days and Time field reflect the meeting pattern of the class.
- The Room displays the classroom that is assigned to the course.
- The Class Dates field displays the beginning and ending dates of the entire class or the specifics dates of an alternate meeting pattern.
- Click on the link in the Class field (in the example above “POSC 479-02 (7349)” to see additional information about the class.
You can see a graphical schedule (showing weekly days and times) of your classes by clicking on the blue “View My Weekly Teaching Schedule” button located below your teaching schedule on the main Faculty Center page. You may use the Display Options box at the bottom of the screen to restrict the fields displayed. Classes that have multiple meeting patterns will be accurately reflected based on the specific dates in the schedule of classes.
To view other weeks or other times, change the display using the “Show Week of”, “Start Time”, and “End Time” fields and click the “Refresh Calendar” button.
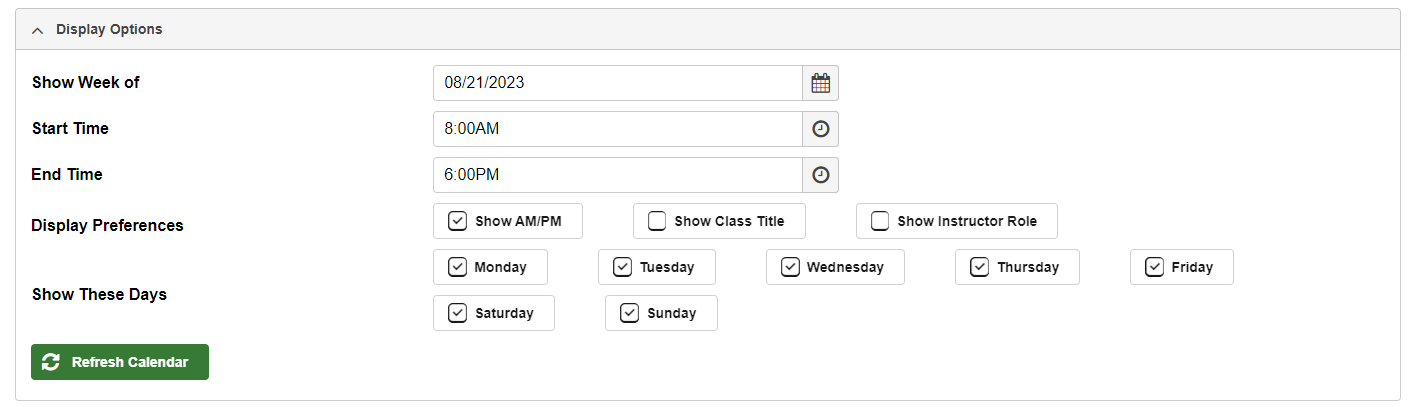
The Show Week of field defaults to the first day of the current term; the Start Time field defaults to 8:00am and the End Time field defaults to 6:00pm.
Click the “Return to Faculty Center” link at the bottom of the screen to return to the main Faculty Center page.
Starting the third week of class each semester (or proportionate for winter or summer terms), students must complete the online Permission to Add request to obtain class instructor and department approvals. All requests must be completed (including approvals) by the last day to enroll for the term, which can be found at Key Dates and Deadlines.
Once a student has requested to add one of your assigned classes, you will receive an email alerting you that the request is ready for your review.
(video displays Faculty Center "classic mode" environment)
- Step 1: To access Permission to Add, log in to your Faculty Center in SSO.
- Step 2: Select Worklist from the right-side menu in your Faculty Center. For users with FLUID Navigation, you may also see "My Worklist" in your left-side navigation.
- Step 3: All of the Permission to Add and Withdraw requests that are available for your review will appear in your Worklist. Add requests will have “ADD” at the beginning of the request name in the Link column before the student’s name.
- Step 4: Select the request in the Link column to view that request.
- Step 5: Review the Permission to Add request submitted by the student. The class information and student’s information (including major and enrollment status) are available on the request page. Scroll down to review the student’s justification for the request.
Note: If the request is to change into a different section of a course the student is already enrolled in (called a swap), then the Swap from box will appear on the request. The Swap from box includes details about the section the student wants to drop. If the request is approved, Enrollment Services will drop the section the student is currently enrolled in and add them to the new section at the same time.
- Step 6: Before you approve requests, please take note that enrollment restrictions will be automatically overridden (for requisites, a closed or full class, or instructor consent) unless you uncheck the option under "OK to override?"
Note: If the student’s request is approved by the instructor and department, but the student has a restriction that the instructor and department do not override, Enrollment Services will need to deny the request and the student will not be added to the class. The student will not be officially enrolled until the student and instructor receive a notification that the request was successful.
- Step 7: Approve or Deny the request by selecting the corresponding button at the end of the request.
If you approve the request, it will be routed for department approvals next.
If you deny the request, you will need to provide a comment. Reasons to deny a request include:- The class is full.
- The student has not met the requisites to enroll in the class.
- When you deny a request, the approval process ends and the student is notified that their Permission to Add request was denied. The comment you provide is included in the email to the student.
- Step 8: If the instructor and the college offering the course both approve the request, Enrollment Services will attempt to add the student to the class. If no restrictions prevent the student from being added to the class, the request will be processed, and the student and instructor will both receive an email notification. The student will not be officially enrolled until the student and instructor receive a notification that the request was successful.
- Step 9: Once the student is added to the class, you will be able to see your updated class roster on the Faculty Center. It may take up to 24 hours for your class list in BeachBoard to update.
Students not attending a class in which they are enrolled must drop or withdraw from the class; failure to do so will result in a failing grade on their record (F or WU). Withdrawing occurs when students remove themselves from classes AFTER self-service registration ends for the term or session.
Once a student has requested to withdraw from one of your assigned classes, you will receive an email alerting you that the request is ready for your review.
(video displays Faculty Center "classic mode" environment)
- Step 1: To access the online withdrawal request, log in to your Faculty Center in SSO.
- Step 2: Select Worklist from the right-side menu in your Faculty Center.
- Step 3: All of the online withdrawal requests that are available for you to review will appear in your Worklist with "ONLINE WITHDRAWAL" at the beginning of each link in the LINK column.
- Step 4: Click on the link in the link column to view a request.
- Step 5: Review the online withdrawal request submitted by the student. You can add optional comments by clicking on the “Add Comment” button.
- Step 6: Approve or Deny the request by clicking on the corresponding button.
- If you approve the request, it will be forwarded to the next step of the approval process – Department Chair.
- If you deny the request, the approval process ends and the student is notified that their online withdrawal request was denied.
- Step 7: If you have other online withdrawal requests to approve/deny, click on the “Return to Worklist” button and repeat steps 3–6. Otherwise, click on the “Return to My Schedule” to return to the main page of your Faculty Center.
IMPORTANT!
You must be assigned as an instructor for each class in the Student Administration system for the class to appear on your schedule. If a class does not display on your schedule, contact the department regarding your assignment. Once the information is changed in the Student Administration system, it is immediately available on MyCSULB and will be available via CANVAS the following day.
Step 1: Select the class roster you would like to view by clicking on the class roster icon (pictured below) to the left of the class.
NOTE: If there is no enrollment in the class, the class roster icon will not display.
If you wish to view a student’s ID card photo, click on the photo icon to the left of the student’s ID number.
- Only students who are enrolled in the class at the time of viewing will appear on the roster, including those with “W” grades.
Step 2: The default Enrollment Status field is “Enrolled.” This field displays all students who are officially enrolled in the class listed in alphabetical order.
- Students who dropped after the second week of instruction in the fall or spring semester will appear on the “Enrolled” roster with (Withdrawn) next to their name, since they receive a grade of “W.” The “W” will show on the student's transcript. Note: “WE” will also appear on the roster.
- Students who have been approved to audit the class will appear on the “Enrolled” roster with (Audit) next to their name.
IMPORTANT! Students must be officially enrolled in the course by the add deadline. This roster displays actual, up to the second information. A student who is not listed on the Enrolled roster is NOT officially registered. Students who are not officially registered as of the Census date of the term may not continue to participate in the class.
- Use the Enrollment Status drop down menu to change the type of roster displayed.
- Up to the week before the start of classes, Waiting displays students who are currently waitlisted for the class. The Waiting roster is listed in waitlist order. Waitlists are purged prior to the beginning of instruction. Once the waitlist is purged, the information is no longer available for viewing.
- Dropped displays students who dropped after the start of classes but before a “W” is posted. For Fall and Spring, this is during the first two weeks of classes. Students who dropped the course prior to the start of classes will no longer appear on any roster and the course will not appear on their University transcript.
- The Student ID field displays the student's Campus ID number.
- The Pronouns field will display the student's declared pronouns.
- The Graduation Candidate field identifies students who are candidates for graduation.
- The Units field displays the number of units each student will earn upon successful completion of the course. For most courses, this will simply be the unit value of the course. For Variable unit courses, the student must identify the number of units they are attempting at the time of enrollment. Errors in the student's units taken must be corrected by the Add deadline for the semester.
- The Program-Plan-Subplan field displays the student's primary Academic Major, as well as the type of degree or certificate the student is pursuing. The student may also be pursuing a second major, minor, certificate, or credential, but these additional programs do not display on the roster.
- The Academic Level field displays the student's projected academic level at the start of the term, which will be the student's actual academic level, provided that the student passed all courses in progress in previous terms. The system uses this field for requisite checking at the time the student registers for the course.
- You can create an Incomplete Grade Agreement for a student from your Class Roster. Please refer to the section on Incomplete Grade Agreements for additional information.
Step 1: Select the class roster you would like to view by clicking on the class roster icon (pictured below) to the left of the class.
NOTE: If there is no enrollment in the class, the class roster icon will not display.
Step 2: The default Enrollment Status field for the class roster is “Enrolled.”
Step 3: Select the students you wish to drop by checking the box to the left of the student’s ID number and then click on the “Delete” button at the bottom of the page. (If you are in Classic Mode, click on the "Drop Students" button.)
Step 4: A confirmation page will appear with a list of student(s) you selected to drop.
Step 5: The students that were successfully dropped will now appear on your list of “Dropped” students. You may need to refresh the page in order for the “Dropped” option to appear in the Enrollment Status drop down menu.
NOTE: Self-Support classes, lab classes and activity classes do not have the instructor drop option.
Step 1: Select the class roster you would like to view by clicking on the class roster icon (pictured below) to the left of the class. The system will display the class roster.
NOTE: If there is no enrollment in the class, the class roster icon will not display.
Step 2: The default Enrollment Status field for the class roster is “Enrolled.” This field displays all students who are officially enrolled in the class and are listed in alphabetical order.
Use the Enrollment Status drop down menu to change the type of roster you wish to use.
Step 3: If you wish to send notification (email) to students, you can use one of the following options:
- Option 1 - If you wish to send notification to selected students, check the box to the left of the student's ID number and click on the “Notify Selected Students” button below the roster and proceed to step 4.
- Option 2 - If you wish to send notification (email) to all students listed, click on the “Notify Listed Students” and proceed to step 4.
- Option 3 - If you wish to send notification (email) to one student, click on the link with the student's name under the “Email” column. This will open a new memo in your default email account on your computer, which may be your personal email account.
Step 4:
- The From: and To: fields will default to your preferred email address. The selected students' preferred email(s) are listed in BCC: field in order to protect the students from viewing other students' email addresses.
- You may change the text in the Subject field.
- Enter the message you wish to send to the students in the Message Text field.
- Once complete, click on the “Send Notification” button.
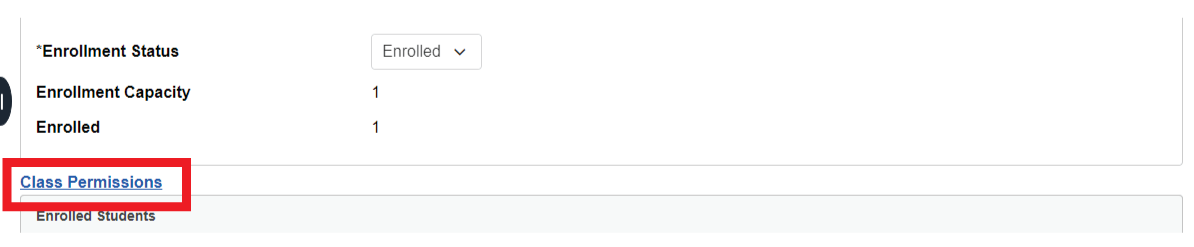
Faculty may view a list of students who have been assigned a permit to enroll in their class.
Click on the Class Permissions icon (pictured below, may resemble a puzzle piece) in the left to see the class permissions page for the class listed.
If there aren't any permissions assigned for the class, the class permissions icon will not display.
Faculty may also view the class permissions page by clicking on the blue “Class Permissions” link located above the class roster on the left-hand side.
Faculty may load their class rosters into Excel by following these simple steps:
- Click on the “Download” link at the bottom of the roster, (you may need to hold down the 'Control' key when you click on the icon or disable pop-up blockers in your browser). A window for Excel will appear to download the roster.
- Click on the Open button.

3. Microsoft Excel will display your roster.

- You may need to resize the columns to the desired width.
- You may save the file to your computer by clicking on “Save” and indicating the folder to save it to.
TIP! Remember to refer to the on-line roster for the current official information!
Mid-term progress reports provide instructors with an opportunity to evaluate student performance at mid-term. These grades are not recorded on the student's permanent record and are advisory grades used for counseling purposes. Although reporting mid-term progress is voluntary, it can be beneficial for students to review their progress and develop plans to maintain or improve their grades.
- Students will be able to see their mid-term progress grades on MyCSULB Student Center as soon as you save them.
- Since MyCSULB only requires an Internet connection and browser, instructors may record and submit grades from campus, home, or any other convenient location that has an Internet connection.
- You are only authorized to grade classes for which you've been assigned as a primary instructor. If a class you are responsible for grading does not appear on your list, contact the department regarding your assignment. Once the information is changed in the Student Administration system, it is immediately available to you via MyCSULB.
Note: The term displayed might not be the term you are attempting to grade. You may need to change the term by selecting the yellow "change term" button at the top-right of the page.
Step 1:
- Choose the grade roster you would like to view by selecting the grade roster icon (pictured below, appears as a folder and sheet of paper) to the left of the class listing.
Note: Mid-term progress reports are normally generated a few weeks after Census for the term.
Only students who are enrolled in the class at this time will appear on the roster. Students who have officially withdrawn from the class will appear on the roster with W or WE grades.
Step 2:
- Verify that the Grade Roster Type is "Mid-Term Progress" by expanding (if needed) the DISPLAY OPTIONS panel.

Step 3:
- Select a mid-term progress grade in the Roster Grade field located to the right of the student's name. Some courses have been designated, through the curriculum process, as CR/NC only or traditional grading only.
- After selecting a mid-term progress grade, press the Tab key twice to move to the next student on the list or use the mouse to select the roster grade field for the student you wish to grade. Continue to move through the roster until all grades are entered. (If grading a large class, we suggest that you SAVE after every 10 entries.)
Please be sure to save the grade roster BEFORE you change the Approval Status to "APPROVED."
Step 4: You have the option to assign a specific mid-term progress grade to multiple students in three easy steps. You may need to expand the GRADE ROSTER ACTION panel.
- Check the SELECT box by each student you want to include (located in the left column of the Grade Roster Action table)
- Select a grade from the dropdown at the bottom of the page.
Select the "add this grade to selected students" button.
Image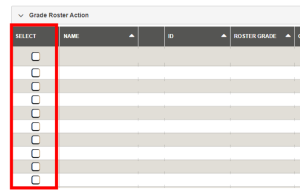
Useful Tips:
- Save early and save often, especially if you have a large class to grade.
- You may enter mid-term progress grades for some students, select the "Save" button at the bottom of the roster, and return later to grade the remaining students.
- Select the "Display Unassigned Roster Grade Only" checkbox to list only students that have not been assigned a mid-term progress grade. This may make it easier to navigate through the page.
Step 5:
Once you have entered and validated all mid-term progress grades, you must save them by selecting the "Save" button at the bottom of the page. A window will appear reminding you to change the Approval Status once all grades have been entered and saved.

Step 6:
Choose "Approved" from the Approval Status field and select the "Save" button again. A new window will appear informing you that the grades have been successfully submitted to Enrollment Services.

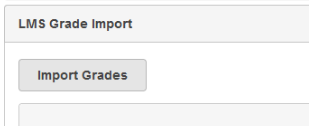
Alternatively: You can select the Import Grades button from the LMS Grade Import Panel to import grades from CANVAS. This panel appears when you expand the DISPLAY OPTIONS panel.
Since MyCSULB only requires an Internet connection and browser, instructors may record and submit grades from campus, home, or any other convenient location that has an Internet connection.
You are only authorized to grade classes for which you've been assigned as a primary instructor. If a class you are responsible for grading does not appear on your list, contact the department regarding your assignment. Once the information is changed in the Student Administration system, it is immediately available to you via MyCSULB.
Note: The term displayed might not be the term you are attempting to grade. You may need to change the term by selecting the yellow "change term" button at the top-right of the page.
Step 1: Choose the grade roster you would like to view by selecting the grade roster icon (pictured below, appears as a folder and sheet of paper) to the left of the class listing.
Note: Grade rosters are normally generated shortly after the last day of instruction for the term. There is no need for concern if you do not see the icon for the class before this date. If you do not see the Class Roster icon, the class does not have students enrolled.
Only students who are enrolled in the class at this time will appear on the roster. Students who have officially withdrawn from the class will appear on the roster with W or WE grades.
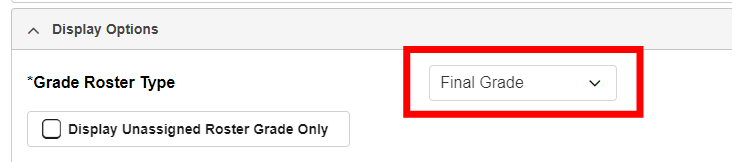
Step 2: Select "Final Grade" from the Grade Roster Type drop-down by expanding (if needed) the DISPLAY OPTIONS panel.
Alternatively: You can select the Import Grades button from the LMS Grade Import Panel to import grades from CANVAS. This panel appears when you expand the DISPLAY OPTIONS panel.
Step 3:
- Select a final grade in the Roster Grade field located to the right of the student's name. Some courses have been designated, through the curriculum process, as CR/NC only or traditional grading only.
- If the student has elected the CR/NC option for a graded course, you will be given the option to select either CR or NC or a letter grade, which the system will convert to the appropriate CR or NC grade.
- After selecting a final grade, press the Tab key to move to the next student on the list or use the mouse to select the roster grade field for the student you wish to grade. Continue to move through the roster until all grades are entered. (If grading a large class, we suggest that you SAVE after every 10 entries).
Note: If a WU is assigned to a student, a last date of attendance must be entered. After saving the grade roster, a date field will appear to the right of the grade input that defaults to the 50% date in the term.
If an F or NC grade is assigned, you will have the option to enter a last date of attendance.
You should change the default date to accurately reflect the last day the student attended your class. Please be sure to save the grade roster BEFORE you change the Approval Status to "APPROVED."
Step 4:
You have the option to assign a specific final grade to multiple students in 3 easy steps .You may need to expand the GRADE ROSTER ACTION panel.
- Check the SELECT box by each student you want to include (located in the left column of the Grade Roster Action table)
- Select a grade from the dropdown at the bottom of the page.
Select the "add this grade to selected students" button.
Image
Useful Tips:
- Save early and save often, especially if you have a large class to grade.
- You may enter grades for some students, select the "Save" button at the bottom of the roster, and return later to grade the remaining students.
- Select the "Display Unassigned Roster Grade Only" checkbox to list only students that have not been assigned a grade. This may make it easier to navigate through the page.
Step 5:
- Once you have entered and validated all final grades, you must save them by selecting the "Save" button at the bottom of the page. A window will appear reminding you to change the Approval Status once all final grades have been entered and saved.
Step 6:
- Choose "Approved" from the Approval Status field and select the "Save" button again. A new window will appear informing you that the final grades have been successfully submitted to Enrollment Services.
The "Approved" status signifies that final grades are ready for official submission to the University. Enrollment Services will post grades daily for rosters in "Approved" status. Once grades are posted, you may continue to view your grade roster(s) but cannot make changes.
IMPORTANT:
- All grades must be entered and rosters must be in "Approved" status by the deadline to submit grades.
- After the grading deadline, any grade roster left in "Not Reviewed" status but fully graded (a grade has been entered for each student) will be administratively posted to meet the university deadline.
- Incomplete Grade Agreements for each I grade assigned must be submitted to Enrollment Services within one week of the grading deadline.
Per CSULB Policy Statement 22-02, an Incomplete ("I") grade may be assigned at the discretion of the instructor when the student has successfully completed a substantial majority (approximately two thirds or more) of the course requirements. The Incomplete grade provides students an extended period of time to complete course requirements.
- The student must contact their instructor to review the possibility of receiving an Incomplete grade.
- If the instructor approves, the instructor must create an Incomplete Grade Agreement in MyCSULB Faculty Center. The agreement will include the conditions for the removal of the Incomplete grade.
- The student must accept the Incomplete Grade Agreement through MyCSULB Student Center no later than 30 days after the end of the term.
- The student must submit their remaining assignments to the instructor, who will assign the final grade for the class.
- The deadline for the student to complete the remaining assignments outlined in the agreement is one calendar year from the last day of the term in which the Incomplete grade was assigned or by the “Deadline for Completion” indicated in the agreement, whichever is earlier.
Create an Incomplete Grade Agreement
You can create the Incomplete Grade Agreement from your Class Roster or Grade Roster.
Class Roster
In your Class Roster, you can select the “Add” button in the Incomplete Grade Agreement column. Skip to Step 3.
Grade Roster
In the Grade Roster, you must first assign an “I” grade for the student in the "Roster Grade" column and then select Save. Then, the “Add” buttonwill appear in the Incomplete Grade Agreement column.

- Assign the grades for your class, including the “I” grade(s). Then, select the Save button.
- Any student who was assigned an "I" grade will have an Add link next to their name in the Incomplete Grade Agreement column. Select the Add link.

- The Incomplete Grade Agreement for the student will already have the basic information included, such as the student and class data. Complete the following information in the agreement:
- Reason Code (select one):
| Reason Code | Explanation |
|---|---|
| A. Met key policy requirements | Student has completed a substantial majority (approximately two thirds or more) of the course requirements. If this student does not meet this requirement, choose one of the other reasons to justify why an Incomplete grade is being assigned. |
| B. Extenuating circumstances | Student could not complete course requirements due to documented circumstances beyond the student’s control. |
| C. Medical (documented) | Student could not complete course requirements due to documented medical reasons. |
| D. Administrative | Administrative decision to assign an Incomplete grade. |
- Grade Without Further Work: This grade will be assigned if the student fails to complete the remaining assignments by the deadline or if the student does not accept the agreement within 30 days of the end of the term. If blank, the grade will default to an “F.”
- Deadline for Completion: The default is one calendar year, but you may choose an earlier date.
- Work Required for Removal of “I” Grade: Enter the remaining assignments that the student must complete. Select the (+) button to add additional rows. Be sure to indicate what percentage of the final grade the assignment is.

- Select OK to save the agreement and return to your roster.
- Create agreements for all Incomplete grades assigned for this class section. You will not be able to set your roster Approval Status to “Approved” until all Incomplete grades have an agreement.
- When you’re ready, shoose “Approved” from the Approval Status field and select the “Save” button again.
- The student will receive an email notification that an Incomplete Grade Agreement requires their acceptance.
Update an Incomplete Grade Agreement
After you have created an Incomplete Grade Agreement, you can make changes to it until the student accepts it. Select the “Update” link in the Incomplete Grade Agreement column to return to the agreement and make any required changes. If the student has already accepted the agreement, then this link will be “View” instead.

View an Incomplete Grade Agreement
After the student has accepted the Incomplete Grade Agreement, you can return to the agreement to review the assignments and mark when assignments have been completed. Select the “View” link in the Incomplete Grade Agreement column.

When the student completes an assignment listed in the agreement, you can select the Completed checkbox and enter the Date Completed.

Once the student has completed all the remaining assignments, you will need to submit a Change of Grade form to change the grade from an Incomplete (“I”) to the final grade.
Changes of final course grades can be made only on the basis of an error, a successful grade appeal (detailed in the separate policy statement on grade appeals), or resolution of an “Incomplete” (“I”) or Report in Progress (“RP”). A final course grade or grading symbol shall not be changed on the basis of additional work submitted, except where an “I” was recorded.
All requests for change of a final course grade shall carry the recommendation of the instructor and the department chair and the approval of the college dean.
Grade Roster
Note: The term displayed might not be the term you are attempting to grade. You may need to change the term by selecting the yellow "change term" button at the top-right of the page.
Select the grade roster you would like to view by clicking on the grade roster link icon ![]() to the left of the class. The system will display the grade roster.
to the left of the class. The system will display the grade roster.

When viewing your Grade Roster, the “Change Grade” button will appear once the grade has been posted and the existing grade is available for change. Administrative grades (W or WE) or Audits (AU) cannot be changed.
Incorrect Grade Submitted
Step 1: Click the “Change Grade” button on your grade roster to initiate your change of grade request.
Note: Be sure pop-ups are enabled for your browser.

Step 2 Enter the grade you wish to assign in the *To field.
Note: If you change any grade to an “I” (Incomplete), you can complete the Incomplete Grade Agreement by clicking on the button.

Step 3 Select reason for the change.
- Incorrect Grade Submitted
- Grade Appeal
- Other (must provide additional text in the Reason For Change field.)
Step 4 Click the Submit button. This will initiate the approval process. Designated approvers will receive an email notification indicating that a grade change request is waiting for their review/decision.
This request will be forwarded through the approval process – Department Chair, Associate Dean, and Registrar's Office.

Make Up of Incomplete (I)
Step 1 Click the “Change Grade” button on your grade roster to initiate your change of grade request.
Note: Be sure pop-ups are enabled for your browser.

Step 2 Enter the grade you wish to assign in the *To field.
Step 3 Enter the date in which the student completed their coursework in the Work Completed field.
Step 4 Select reason for the change – Make Up of Incomplete.
Step 5 Click the Submit button. This will initiate the approval process.
This request will go directly to the Registrar's Office for processing.

Completion of Report in Progress (RP)
Step 1 Click the “Change Grade” button on your grade roster to initiate your change of grade request.
Note: Be sure pop-ups are enabled for your browser.

Step 2 Enter the grade you wish to assign in the *To field.
Step 3 Enter the date in which the student completed their coursework in the Work Completed field.
Step 4 Select reason for the change – Follow Up to Report in Progress.
Step 5 Click the Submit button. This will initiate the approval process. Designated approvers will receive an email notification indicating that a grade change request is waiting for their review/decision.
This request will be forwarded through the approval process – Department Chair, Associate Dean, and Registrar's Office.

Reviewing the Status of the Grade Change Request
Step 1 Click the “Change Grade” button on your grade roster to access your change of grade request.

You will see the status of your grade change request as it goes through the approval process.
