


Canvas FAQs
We are constantly adding new FAQs regularly as we learn more and hear from you! If you have questions not addressed here, please email canvas@csulb.edu.
Table of Contents
Click a link to jump to the FAQ content below.
For Instructors:
There are multiple methods of adding extra credit to a Gradebook, and directions with screenshots are available in the following resource: How do I give extra credit in a course?
- If you would like to add extra credit to an assignment, you can simply award more points than the designated point value of an assignment. You can do this directly in the Gradebook; using a rubric with more points than the assignment value, or in the grade box in SpeedGrader.
- To add extra credit to a quiz, use 'fudge points' in SpeedGrader.
- If the extra credit is a separate grade, create an assignment worth 0 points and award any extra points to students on this assignment.
- If you have weighted assignment groups AND have the extra credit assignments in their own assignment group (bringing the total weights over 100%), 0-point assignments will not work. In that specific case, please carefully read this additional resource: Extra credit using weighted assignment groups.
It is not possible for instructors to delete student submissions in Canvas. The option to delete assignment submissions is only available to admins. Please contact canvas@csulb.edu if you would like us to remove any file upload assignment submissions from students.
The Global Navigation Menu cannot be altered. However, you can edit or change items in the Course Navigation Menu by clicking on Settings within a course then click on the Navigation tab. You can then drag and drop items to reorder or hide them.
The equivalent of "Homepages" on BeachBoard (D2L) is "Pages" in Canvas. We recommend that you use Canvas Commons to look for various templates and copy them into your courses.
Instructors can use the New Analytics feature to view summary of student course activity and participation. Note that this currently does not include seeing which students viewed a specific page.
You can view the course access report for an individual user in the People section of your course. The course access report shows a summary of user participation in your course.
You can view the full specific report for a student by viewing student analytics.
You can also view your specific interactions with a student in the student interactions report.
Global Announcements notifications are enabled by default. To check if you are receiving immediate notifications, we recommend the following:
- From the Global Navigation menu, click on Account then select Notifications.
- Make sure that Settings for is set to "Account" then scroll down to "Global Announcements" and click the notification bell to select "Notify Immediately."
Note: Global announcements notifications will only be sent to users with active enrollments in the current term, regardless if courses are published or not. This means that when users are not enrolled in at least a course in Canvas, they will not receive announcements.
Once a course has concluded, it becomes "read-only." This will prevent users from editing their past Canvas courses, including any attempts at enrolling new people.
If you would like to access to your course or enroll users after your course has ended, please contact canvas@csulb.edu.
In Canvas, at the end of the semester your "old" course sites may disappear from your dashboard and your current courses list. This happens once a course is completed and the term has ended. Your course has not been deleted from the system but the course has been moved to "Courses." Select "All Courses" and navigate to "Past Enrollments" to view your courses from previous semesters.
Yes! ATS has developed optional Canvas Course Layouts (a.k.a. "templates) that instructors can import into their courses to get started quickly.
We recommend you use our Canvas Course Templates. These do help you organize your content while also addressing some QM standards.
This feature is not available in Canvas. However, they do have a Student Interactions Report that provides you with the last time they interacted with the course, their current score, final score, and a list of any ungraded assignments.
View this Student Interactions Report guide to see how to access this information for your course: How do I view a summary of all of my interactions in a course
You must assign a peer review due date AFTER the discussion due date. This will provide students with two due dates—one for the initial response and the other for peer review. If you leave the peer review due date blank, the assigned due date will be used instead.
A development course is a staging area where you can build and modify your course content entirely and then copy it into your live course when released each semester. Complete the Development Course Request Form. Visit Canvas Course Types for a full description of the different types of courses in Canvas.
To request for multiple sections of a course to be merged into a single course shell, visit the Course Merge Request link.
Depending on the LMS, you can transfer course materials from another campus to Canvas at CSULB. Please be aware that some course materials and content may not be copied over correctly.
- If you are exporting and importing from Canvas to Canvas, please read How do I export a Canvas course? and How do I import a Canvas course export package?
Use our Course Migration Job Aid [PDF] for instructions to copy your migrated BeachBoard course content into the Canvas Live course in which you will be teaching.
Yes, this service will continue to be provided by the Bookstore via the VitalSource platform and you can contact D1DA@csulb.edu to coordinate this material into the Canvas course.
Please send feedback or comments to canvas@csulb.edu. We also recommend using the Submit a Feature Idea link found on the Help menu in Canvas.
To streamline faculty grading and reporting at the end of a semester to Enrollment Services, instructors can use the "grade-pull" feature from Canvas via the Faculty Center portal for Mid-Term Grades. All assignments must be graded and include scores for every student prior to using this tool.
More information can be found in the resource guide: Transfer Mid-Term Grades from Canvas to Faculty Center [PDF].
Watch this video for a quick overview of the process to submit grades in Faculty Center:
Instructors can use the "grade-pull" feature from Canvas via the Faculty Center portal for Final Grades. All assignments must be graded and include scores for every student prior to using this tool.
More information can be found in the resource guide: Canvas Final Grades For Faculty Center [PDF]
For directions on how to import grades from Canvas to Faculty Center, please refer to the Faculty Center's Grade Roster page and select the "Final Grades" accordion.
For more information, please view the What's New with Faculty Center and Advisor Center page.
Watch this video for a quick overview of the process to submit grades in Faculty Center:
- Go to Grades then click on the three vertical dots next to Total and select Apply Score to Ungraded.
- Under “Grade for ungraded artifacts,” input 0 and select “All ungraded artifacts.”
- Optionally, you can also check the “Apply missing status” for missing assignments that students have not turned in. This will ensure that all missing assignments will have a grade of 0.
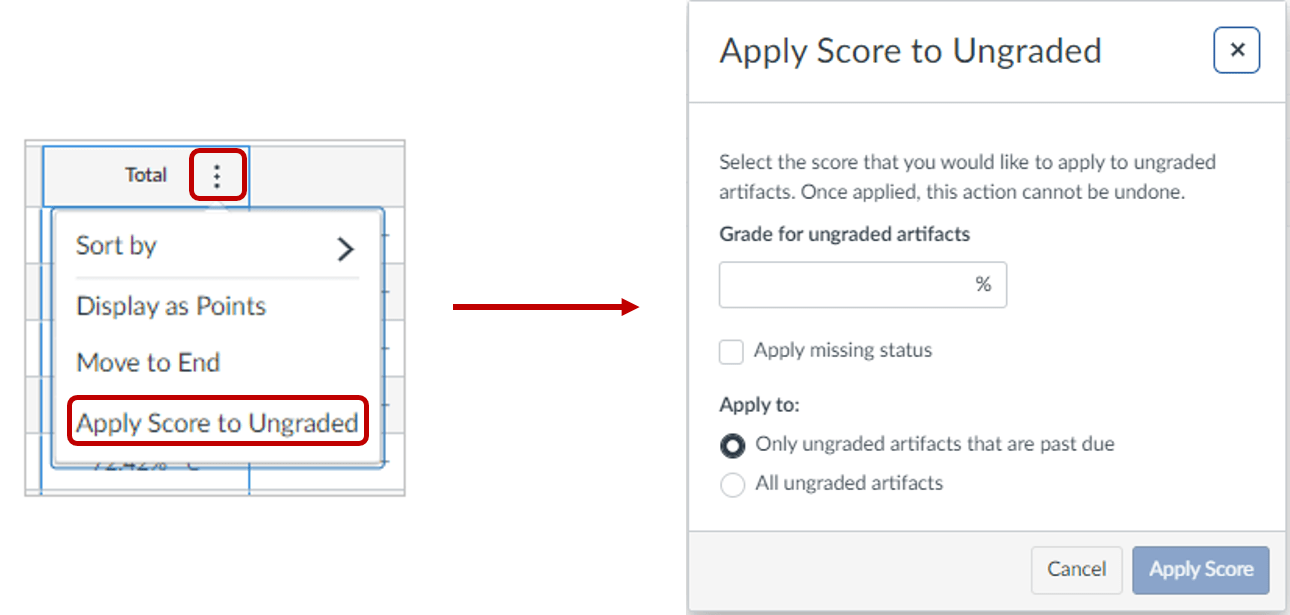
Note: We recommend this step at the end of the semester after you have finished grading. This will catch any ungraded items that you might have missed.
Faculty should establish a baseline on how to approach communication with their students, whether it be through announcements or the Canvas inbox. It's recommended that instructors set expectations on how students should configure their account notifications for specific courses.
In order to send a message to all course users before the semester starts, you will need to publish your course. If the course is not published, you will get an invalid error.
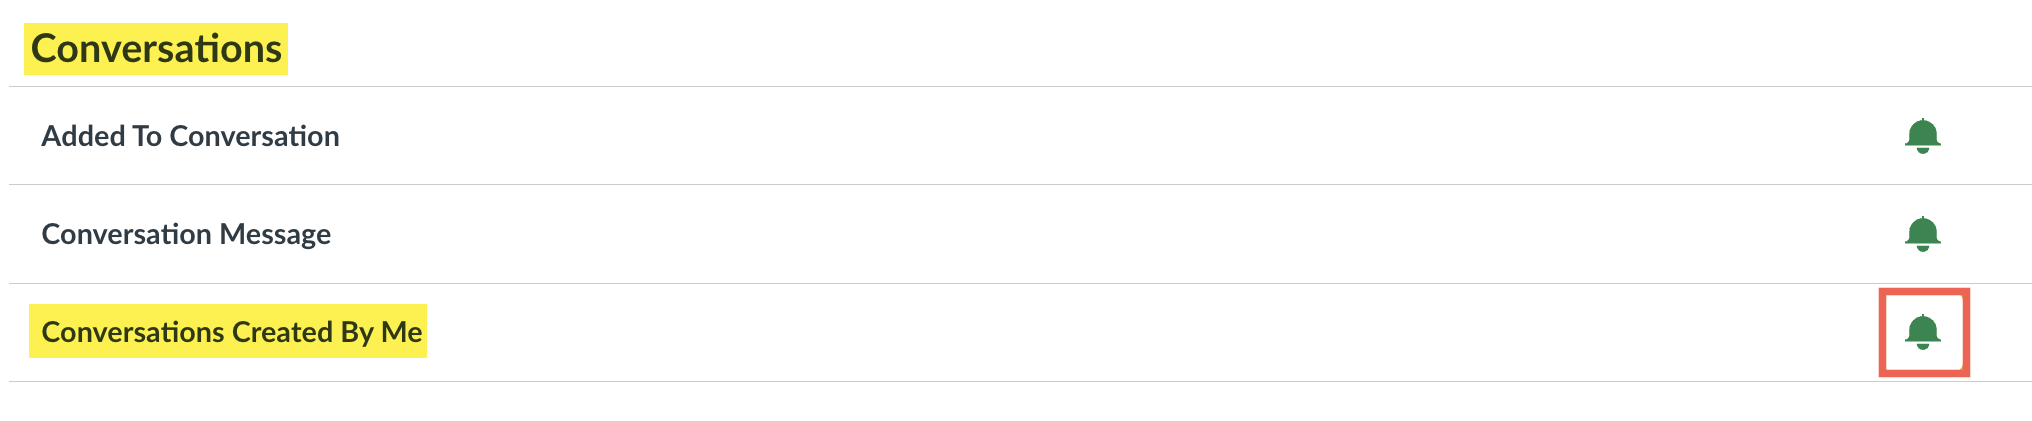
- From the global navigation menu, select Account then click on Notifications.
- Scroll down to the Conversations section and enable the green bell for Conversations Created by Me.
Creating Zoom meetings through the Canvas / Zoom integration for your course creates a corresponding Calendar event for you and students to reference in the Canvas Calendar. These calendar events are copied over to subsequent Canvas courses and calendars with their previous semester names unless explicitly not included in the import process.
If previous semester Zoom meeting calendar events were imported into your current semester course calendar, you will need to manually remove the duplicate calendar events one at a time.
Watch this video for a demo of how to avoid this issue or read the instructions below the video:
Deselecting the Calendar Events in the Import Process
When selecting to "Copy a Canvas Course" content from one course to another, if you select the "All Content" option when you import from a past course, this will include all the calendar events for your past Canvas / Zoom meetings, with links to those previous meetings in you (and your students') calendar as well as the "To Do" list on your Canvas Course Syllabus page.
To avoid including these Zoom calendar events, please follow these instructions:
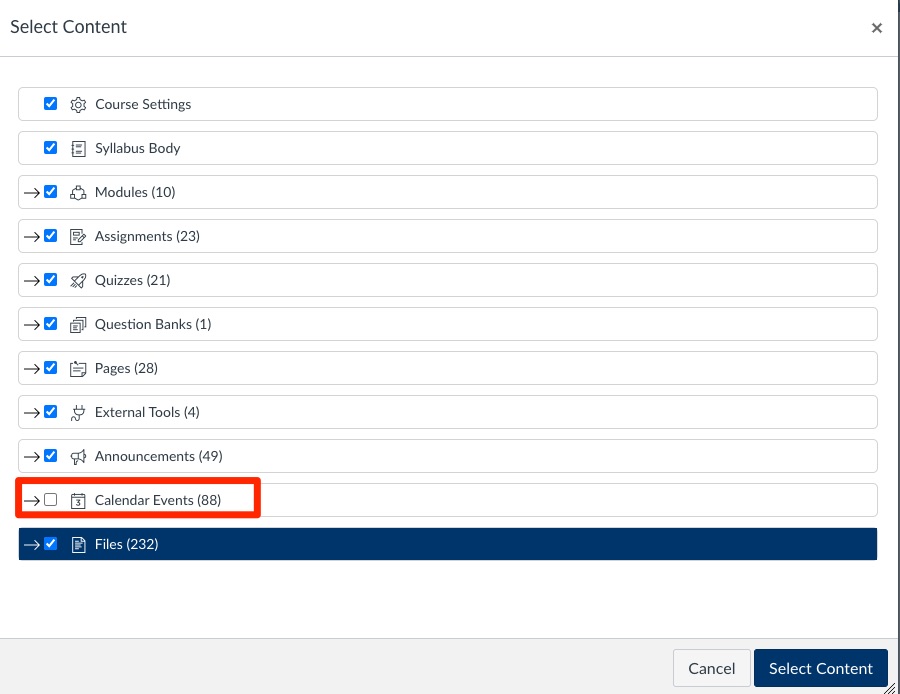
- In your current semester Canvas course, select "Import Existing Content" from the Home page of the course and click the "Select specific content" radio button, then click the "Import" button.

- In the "Current Jobs" list near the bottom of the page the Course Copy for the previous semester's content will appear. Click the "Select Content" button to identify the content that you will import.

- In the pop-up box that opens, select what you would like to import, but more importantly, DO NOT select "Calendar Events" from the list.
- Click the "Select Content" button at the bottom of the pop-up box to complete the import.
Fudge points allow you to manually add or remove points from a student's overall quiz score. Fudge points are a form of extra credit for quizzes specifically. Refer to the webpage: How do I adjust the point value for an entire quiz using fudge points in SpeedGrader?
No, you will need to change the question in Quizzes and the Question Bank.
You can shuffle or randomize questions by using "Question Groups" in Classic Quizzes. Refer to the webpage: How do I create a quiz with a question group to randomize quiz questions?
New Quizzes has a Settings menu that allows instructors to shuffle or randomize questions across the entire quiz. More information can be found on the webpage How do I manage settings for a quiz in New Quizzes?
To check if New Quizzes have been enabled in your course, click on Settings from the course navigation. Select the Feature Options tab then scroll down and enable New Quizzes by clicking on the X icon.
To migrate a quiz from Classic Quizzes to New Quizzes, click on the three vertical dots then select Migrate. While New Quizzes migration supports all question types, you should still review your quizzes before assigning them to students. By default, migrated quizzes are unpublished. For more information, please read this article: How do I Migrate a Canvas Quiz to New Quizzes
Students do not have access to LockDown Browser in the navigation bar because it directly links to the LockDown Browser Dashboard, which only allows instructors to enable the tool for specific quizzes/exams. For students, they will need to go to Quizzes and click on the quiz or exam that has LockDown Browser enabled. Here is a video that explains the student experience for LockDown Browser in Canvas
This will create a copy of the quiz/exam in Quizzes and the Question Bank.
- Exporting a quiz and importing it back to a course will automatically create a Question Bank of that quiz and add the quiz to Quizzes.
- Create a quiz and add in all the questions you would like to be in your Question Bank.
- Export that quiz as a QTI file (Settings > Export Course Content > Select Quiz > Check the quiz to export).
- Download the New Export.
- Go back to Settings and select Import Course Content.
- Select QTI .zip file and upload the file you downloaded.
- Click Import.
Yes, courses must be published in order for students to view them. Instructors can utilize the time when a course is initially not published to set up their course for the semester.
New students will learn about Canvas through the campus SOAR program. Continuing students will learn about Canvas through direct communications from ATS. Faculty are encouraged to share Canvas resources with students. Visit Canvas Student Training and Support for resources.
Students are automatically enrolled in the "Passport to Canvas" self-guided orientation course available in their Canvas Dashboard.
Students are encouraged to take the "Passport to Canvas" self-guided course. This has been automatically added to your Canvas Dashboard. We also recommend viewing the Canvas Student Guides from Instructure as well.
From your Canvas Dashboard, click on Courses then All Courses to view all of your classes.
Canvas supports a wide variety of languages.
More information on this can be found here: Canvas Language Support.
Students can access the Inbox located on the navigation panel in Canvas. It is an internal messaging system that allows students and instructors to communicate with each other through the platform. Your instructor may provide other means to communicate when the class begins.
When accessing Kaltura media embedded in Canvas such as the Media Gallery, the "Access Denied" error message will display if your browser is blocking third-party cookies. Depending on which browser you are using, you must allow for third-party cookies.
- Enable Third-Party Cookies in Google Chrome (Extensions can also block cookies. Use incognito mode if the error persists)
- Enable Third-Party Cookies in Apple Safari (Uncheck "Prevent cross-site tracking" and "Block all cookies")
- Enable Third-Party Cookies in Mozilla Firefox (Uncheck "Cookies")
Download LockDown Browser if you have either a Windows or Mac.
If you have a Chromebook, please download the LockDown Browser extension.
You can also download LockDown Browser by going into your Canvas course, click on the Quizzes link, then click on the name of the test. After clicking on "Take Quiz," a download link will appear for you to click on.
To ensure Respondus LockDown Browser functions with minimal interruptions during an online test, please consider the following best practices before launching LockDown Browser:
- Temporarily disable the computer’s spyware or anti-virus software.
- Spyware detection and anti-virus software may interfere with Respondus Lockdown Browser. Examples include AVG, Spyware Doctor, Ad-Aware, Spybot, Norton, McAfee, etc.
- Temporarily disable the computer’s firewall.
- Close all open programs and applications.
- If using a PC, you can do this through the Task Manager. If using a Mac, you can do this through the Activity Monitor.
- Make sure the Internet connection is stable.
- Respondus Lockdown Browser requires a constant Internet connection. If there is any break in connectivity, a blank white screen may appear.
- Make sure JavaScript and cookies are enabled.
- Make sure your browser’s pop-up blocker is turned off.
- Make sure you have an updated version of Java installed and that Java is enabled.
If you experience freezing while Lockdown Browser is running, you may need to force shut down your computer by pressing and holding the power button. Once you restart the computer, launch Lockdown Browser again to continue from where you left off.
If you are still having issues with Respondus LockDown Browser, please submit a ticket with Respondus Technical Support.
